General Questions
How to improve my site loading speed?
We recommend using the WP Super Cache, W3 Total Cache plugins.
Excluding pages from the cache
If using caching plugins, make sure you exclude the following pages from the cache through their respective settings panels:
- Cart
- My Account
- Checkout
- Wishlist These pages need to stay dynamic since they display information specific to the current customer.
How to update Visual Composer Plugin?
Important! Before updating this plugin, you should delete this plugin in Plugins on admin sidebar
Step 1: Go Plugins >> Installed Plugins
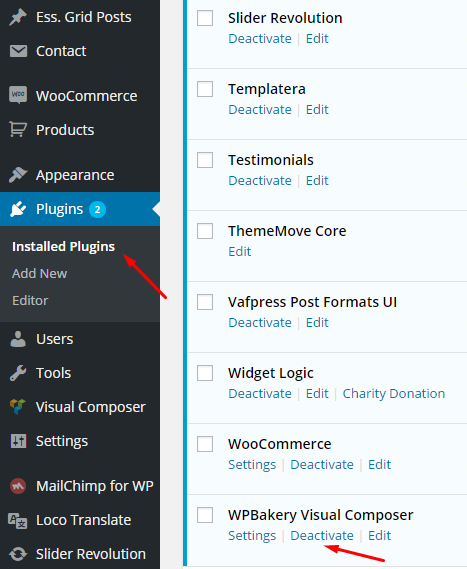
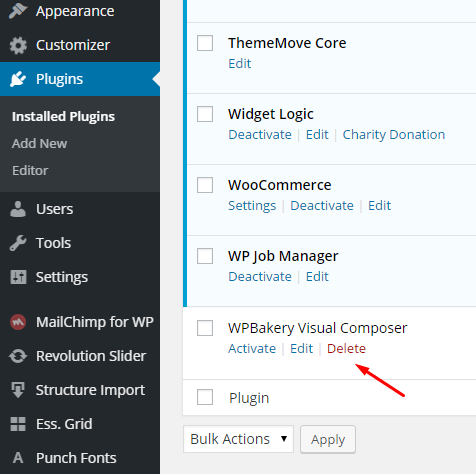
Step 2: Hit Deactivate >> Delete
Step 3: Go Appearance >> Install Plugins on admin sidebar
Step 4: Select WPBackery Visual Composer plugin
Step 5: Hit Install >> Activate.
After activating the plugins, my site crashes
This is NOT our Theme’s issue, but a server configuration issue. If this ever happens it is most likely due to low PHP configurations on your server and it can be easily remedied by upping the values. Check out our Requirements for ThemeMove’s Items
How to change colors for fonts
Change Colors
Using Hex Codes
Step 1: Determine which color option you’d like to change
Step 2: Click Select Color, then enter a specific Hex Code or drag the color picker around to generate a Hex Code for your chosen color.
Step 3: Don’t forget to save your changes to apply them.
Using RGBA
Step 1: Determine which color option you’d like to change
Step 2: Generate an RGBA value using this tool. Must be in this format: RGBA(0, 0, 0, 0).
Step 3: Click Select Color, and paste your RGBA value into the field. Notice how it will convert back to the hex code version of your selected color. Simply paste the RGBA value again to apply it.
Step 4: Don’t forget to save your changes to apply them.
Change Fonts
To change the theme’s default fonts, we highly recommend using the WP Google Fonts plugin, which allows you to easily take advantage of the scores of type options provided by Google Fonts. To see all of the font options provided, check out Google’s Font Directory.
To search for and install this plugin in WordPress:
On your WP Dashboard’s left-hand menu > Plugins > Add New
Search for the WP Google Fonts plugin > Install Now > Activate
Step by step
Step 1: Select your font – To begin, under the “Font 1” section, select your desired Google Font from the drop-down menu’s list.
Step 2: Choose your font styles – “Font styles” refer to bold, italic, narrow, etc. stylings of your font. Some fonts offer more options than others. WordPress will be able to make your “normal” font look bolded or italicized, thought for the cleanest look, it’s recommended to choose one of the bold or italic options in the list that is specifically designed for your font.
Step 3: Assigning your font – In a perfect world, you could simply check the box next to the various text elements that you’d like to apply the new font to. Unfortunately, this doesn’t always work the best. You’re very welcome to try, of course, however, we recommend using the 4th option instead (see Step 4).
Step 4: Assigning your font with custom CSS – By using CSS code to target the specific theme fonts you’d like to change, we’re able to be much more precise and effective. Don’t know how to determine a text element’s exact CSS selector in order to target it? No worries! We’ve got you covered.
Select your theme’s “Targeting text elements” article, simply locate the text element you’d like to change the font of in the list, copy its code, and paste the code into the “Custom CSS” box of the font plugin.
Please be sure to replace the dummy “your-font-name-here” text with your desired font name
(Note: the ‘ ‘ characters wrapping the font name are important to keep!)
And, as always, if you don’t see the text element you need or if you are confused, please don’t hesitate to open up a new support ticket. We’re very happy to help!